Time Continue in Motionbuilder in Fcurve
In this post I will take you through the processes required to create a walk cycle from motion capture data. I have provided an explanation and possible work flow suggestions at each stage of the process. Hopefully this will enable you to create not only a beautiful walk cycle, but also help you understand some of the principals and practices involved in motion editing.
The main steps covered in this tutorial are:
- Importing an animation file on to a skeleton
- Adding a Character to the Story Tool
- Creating a Loop in the Story Tool
- Aligning a take in the scene
- Plotting a take to a Control Rig
- Creating a Loop Pose
- Applying a Pose
- Correcting footsteps
- Editing errors in an animation
- Open a MotionBuilder file containing the character you are going to use for editing. I usually save a "clean" file for each character once I've characterize it to use for editing or importing in to scenes.
- Select the characters hips. In the Viewer change to X-Ray view (press Ctrl+a in the Viewer) and LMB select the hips of the skeleton or switch to Schematic View (Ctrl+w) and click the hip node to select it. Selecting the hips allows you to specify which heirarchy you want to import the animation on to.
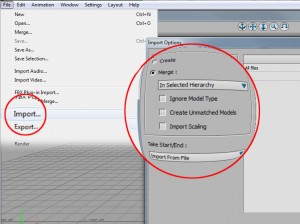
- Select the files you want to import. Click File>Import…. to open a pop up window to select the files you want to import for editing. In the Import Options select "Merge: In Selected Hierarchy", turn off "Ignore Model Types, Create Unmatched Models and Import Scaling and set Take Start/End: to Import From File.
- If you get a warning pop when you try to import the file, check the number of models MotionBuilder can match is about the same as the number of joints in your skeleton. If it is click continue other wise check the file you are importing contains the right skeleton and has the correct naming convention.
- Save the file. Once you have imported the animation play it through and check the characters is moving correctly and there are no errors like flipped limbs or popping in the animation. If everything looks good save the file under a new name like **takeName_EDIT** It's very easy to forget you have imported the animation in to your "clean" character file and save over it or discover Ctrl-a ( X-Ray) and Ctrl-s ( Save ) a little too close sometimes.
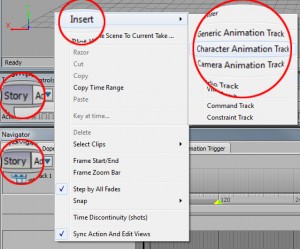
- Insert a Character Animation Track. In the Story Tool activate Story and right-click and Insert > Character Animation Track. Select your character from the …Character drop down menu. Rename the Character Track to the name of the take you are editing. (Right-Click > Rename. )
- Insert Current Take. Select the Story track you have just created and RMB>Insert Current Take to import the animation from the current take in to the Story tool. Select the clip in the "Story" window and frame it by pressing "a" to frame all or "f" to frame selected.
- If you haven't characterized your character it is still possible to use the Story Tool to edit the animation on a skeleton. Select the entire character skeleton by SpaceBar+Right-Clicking the hips of the character. This selection can then be dragged in to the Story Tool using Alt+LMB, which will automatically create an animation track for the selected objects.
- Find a section of the take to create the loop from. First you need to find a section of the take where the character is traveling at a constant speed in a straight line. The middle of the take is usually a good place to use as the performer will have settled in to their stride by this point. You can always test how well the section you plan to use will loop by altering the playback range to the required frames and viewing the action in an orthographic window with the character walking towards camera. If the character appears to be looping at this point then you should have very little work to do. If there character is "popping" quite a lot as the take loops or appears to be speeding up or slowing down it is probably worth considering using a different part of the take.
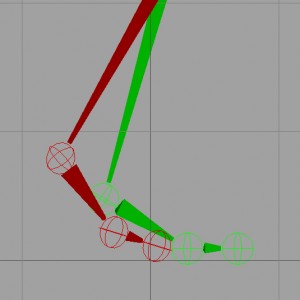
- Find a start pose. Once you have identified a good section to use for the walk cycle you will need to find a pose that will be easily recognisable again in the take. One foot passing the ankle on the other leg is a good pose to use as it's half way through the walk and is also an easy pose to identify later in the take. Using an orthographic view find the frame where the foot and ankle are roughly aligned. It is very rare that both limbs will line up exactly so you will need to ensure if one foot is slightly behind the ankle in your start pose you use the frame with the foot slightly behind the ankle for the end pose.
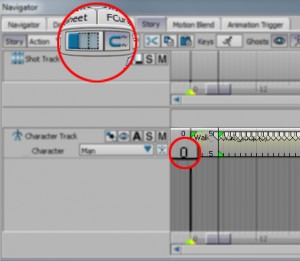
- Trim the clip. Set Loop/Scale Clips to Loop and turn on Snapping. Trim away the unwanted frames before the start pose by dragging the start of the clip to the correct frame. Be careful not to move the entire clip when doing this. If the cursor is in the correct place over the clip you should see it change to the trim tool and the last frame of the clip shouldn't change when you change first frame. It is also possible to change the start frame of the clip by double clicking the bottom number at the start of the clip and typing in the frame number of your start pose.
- Set the end frame. Find a matching end pose by stepping through the animation to a frame where the character is in a pose that resembles the start pose as closely as possible. Repeat the method used to create the start pose, this time trimming away the unwanted frames after the end frame. Drag the end of the clip to the frame containing the end pose, again being careful not the drag the whole clip. Or double click the bottom number and enter the frame number of the end pose.
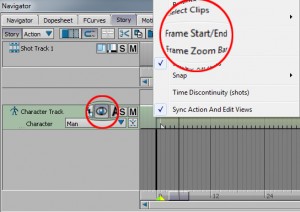
- Re-time the clip. Change the clips start time to 1 by Left click dragging the entire clip so it starts at frame 1 or double click the top number at the start of the clip and change it to 1. Then re-set the start and end frame of the Transport Controls by right clicking the track in the Story window and selecting Frame Start/End.
- Turn on Ghost Visibility. Select the clip and turn on Show/Hide Ghosts and change the "Viewer" to Normal or X-Ray mode so you can see the trajectory of the clip.
- Center the take. With the clip selected press "t" and translate the clip globally so it is positioned at center of the scene or type in zero values for it's x, y and z positions. Repeat the same process with the rotation to align the trajectory of the clip down an axis. For a locomotive action like a walk I usually align the clip to face down positive Z so the character walks towards the front orthographic camera. Aligning the animation this way allows you to watch the playback in an orthographic view and the character will appear to remain on the spot.
- Check the loop. Change to the appropriate orthographic view so the character is walking directly in to camera. Turn on continuous playback and play through the animation to see how well the animation loops. As the first and last frames will be almost identical there should be very minimal popping as the animation loops. Also check the speed of the action looks consistent and the character doesn't appear to be speeding up or slowing down. The better the loops looks at this stage the less editing you will have to do later.
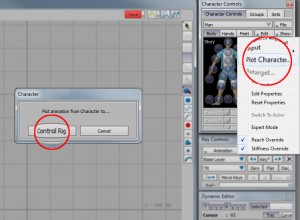
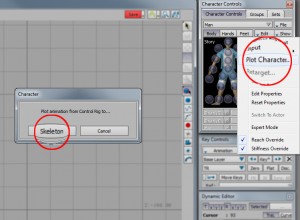
- Plot to the Control Rig. In the "Character Controls" panel select Edit>Plot Character…>Control Rig and if prompted create an FK/IK rig. Set the options in the Character pop up window to your specific scene requirements – I usually use Plot On Frame, set the Plot Rate according to the project I'm working on, turn on Unroll Rotation Filter and turn off Constant Key Reducer.
- Turn off Story. It's a good idea to turn off Story at this stage to prevent confusion later. It's surprising how many times you'll forget to turn it off and then wonder why the edit you've just plotted to the skeleton doesn't seem to have changed the character animation.
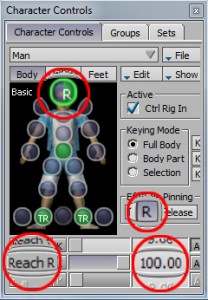
- Pose the character. Begin by editing the characters pose on the first frame to create an appealing start pose. Align the head so it is looking in the correct direction and turn on Reach R and pin the effector rotation. This allows you to adjust the rest of the characters body without affecting the position of the head. Remove any mesh intersections or other artifacts that may be visible and finally pose the fingers. Always remember to switch between different view-ports to make sure the pose looks good from all angles.
- Set Full Body Key. When you are happy with the pose, turn on Fully Body Keying Mode and set a Flat key on layer 1. If you are currently working on the Base Layer then you will get a pop-up recommending you key on Layer 1. Click Go to Layer 1 if you get this pop-up otherwise you will key over the first frame of the original animation.
- Create a Pose. Add the pose to the pose library by pressing the Create button in the Pose Controls window. When you see the new pose appear in the Poses list, which may require expanding, Right click it and Rename it to something appropriate so it is easily recognisable.
- Paste the pose. Go to the last frame of your animation and paste a fully body pose of the pose you've just created matching the current position of the characters hips in Z and set a flat key.
- To break that down a little –
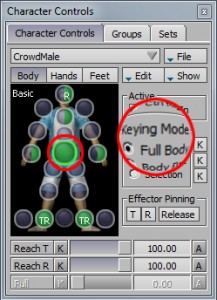
- In the Keying Mode section of the Character Controls window turn on Full Body mode. Using Full Body Keying Mode will apply any pose to the entire body of the character. It is also possible to paste a pose to a Body Part or Selection by selecting the appropriate Keying Mode. This can be used when applying finger poses to an animation.
- Select the characters Hips in the Character control window. Selecting different limbs tells MotionBuilder to paste the pose relative to that limbs current position. If you are using Body Parts or Selection the pose will only be applied to the selected limbs which can be useful for applying hand poses – but that's another tutorial.
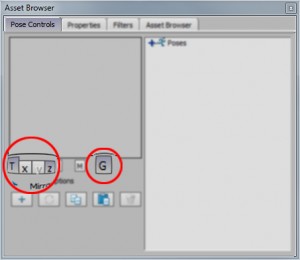
- In the Pose Controls window turn off everything except Match Translation Z Component and Respect Gravity. Once you have identified which limb to align the pose with you have the ability to align a pose to that particular limb's current position. When creating a looping animation like this one you only need to match the pose along the axis the character is traveling, in this case positive Z. The best way to see how the different combination of match options, limb selections and Keying Modes works is to try them out yourself.
- Paste the Pose. It is possible to paste the pose using the paste button in the Pose Controls window or by double clicking the pose name.
- Set a flat key.
- Check the animation. Turn on Continuous play in the transport controls and play the animation back to check it is looping correctly, ignoring the sliding feet for now. You can view the animation in an orthographic view so the character appear to be in walking in place or you can turn on "In place" mode in Character Settings > Modifiers > In Place > Lock Z. Also try flipping between the first and last frame to make sure they are identical.
- Key on Body Parts. Turn on "Body Part" in the "Character Controls" panel so any edits or key frames you set will only effect the currently selected limb and not the entire body.
- Stabilise the planted foot. Go to frame one and select the foot controller for the foot that is currently planted on the floor. Right click on the key frame in the Transport Controls or Select the Translation keys in the FCurves window and right click and "Copy" the key. Scrub through the animation to the frame where the toes of the planted foot are just leaving the floor and paste the key on that frame. With the same foot still selected, Copy the last key of the take. Then scrub back through the animation to the frame where the heal touches the floor for the last time and "Paste" the key over it.
- Set interpolation to Flat. Select all the keys in the Transport Controls by right clicking on the time line and selecting "Select All" from the pop up menu. Right click again on the time line and choose "Interpolation > Flat" to set all the tangents on the keys to flat. Changing the tangents to flat helps prevent unwanted movement on the feet.
- The key frames created on Layer 1 are actually offsets from the objects original position. These offset will remain until the limb is moved and another key is set. As an offset has been created at the beginning and end of the take the when we created the poses the foot will interpolate between these two positions over the length of the animation. This can create a noticeable "sliding" effect in the foot especially when the foot should be stationary. By copying and pasting the correct keys we can maintain the offset position of the foot when it should be stationary and force the interpolation to happen while the foot is off the floor. This will look more natural and hopefully "hide" the edit. The same principle can be applied when editing any limb in this type of situation.
- Stabilise opposite foot. The same basic idea can now be applied to the other foot, except his time the position that needs fixing is in the middle of the animation.Scrub through the take until the opposite foot contacts the floor with the heel. Create a flat key or a zero key on this frame and copy and paste this key frame to the frame where the toes are just leaving the floor.
- This creates the same type of fixed or constant key we just created so the foot will remain fixed while it is on the ground. It may be necessary to try the foot in a few different positions to find the position that creates the least or no errors. Keep checking the the character still looks to be balanced and there that you haven't created any popping or hyper-extension in the leg by over stretching the IK. A good way to correct these types of errors is to use the Fcurve editor. By selecting the appropriate channels on both key frames at the same time you can make minor adjustments to their values rather than having the adjust one key frame and then update the other.
- Check for sliding. Play through the animation and check the feet aren't sliding or floating when they should be planted. If they are, begin by checking you have all the tangents on layer one set to flat. Then check the errors aren't on the base layer/original animation.
- Remove artifacts. Look for any other artifacts that may have been created when adding the poses. Where possible work in Body Parts Keying Mode when editing out things like mesh intersections, hyper extension of limbs or "unappealing" poses.
- Edit one limb at a time. Try to edit all the errors on one body part at a time before moving on to the next, unless the other body part is causing the problem. Sometime the error you can see may be caused by a different body part. For instance lowering the hips might solve any hyper-extension you are seeing in the legs with one key frame rather than editing each leg individually over the length of the animation.
- Keep all edits on one layer. I would recommend trying to keep all your edits on one layer. It is possible to create lots of different layers to edit your animation on in MotionBuilder, but unless you have a very disciplined way of working I would recommend keeping all your keys on the same level. It's very easy to plan to edit each limb on a different layer and equally as easy to accidentally edit the wrong limb on the wrong layer and then be unable to find the key that's causing the problem in your animation. It is also much simpler to adjust all the keys on a character if all the keys are on one layer if. The only time I would add a second layer is if a simple offset could can be applied to the entire animation to fix it or change it. This would create a single offset but preserve any edits I've made on the lower layer.
- Edit on extremes. If there are parts of the animation that require editing, try to do all your editing on the most extreme frames using as few frames as possible. For instance if the hand intersects with the leg, begin by finding the frame where the intersection is at it's greatest and set a key. Then find a frame either side of this "extreme" key where the arm is in the correct position and set a key on it. You should now have three keys, one in the middle representing the most extreme frame where the edit should happen and 2 either side representing the point in the animation where you want the arm to go back to it's original position. Now you can go in and edit the animation on the "extreme" frame to remove the problem, while the other two keys will ensure the edit you make won't affect the rest of the animation.
- Check the animation. When you think you have finished all the editing, play through the animation to make sure you haven't missed anything. View the animation from different angles and in different view-ports and try changing the playback speed, either in the Transport Controls or by using the jog control (holding down "j" move the mouse left to go forward or right to go backwards) to view the animation at different speeds. For smooth playback you will need to make sure you aren't using "Play on Frames" or "Snap & Play on Frames" in the Transport Controls.
- Plot the take to the Skeleton. When you are happy everything is look good plot the animation to your skeleton. In the Character Controls select Edit>Plot Character….>Skeleton.
- Check the plot was successful. Play through the animation one last time and check everything is still looking good and that the animation has plotted correctly. Look for any errors you might have missed and everything is working as it should.
- DO NOT RE-PLOT TO THE CONTROL RIG. If you need to go back and make any adjustments to the animation simply turn the control rig back on. If you Re-plot the animation to control rig you will loose all of your original key frames and permanently "plot" any errors in to the animation.
- Save the file. Once you are happy with the animation all that remains is to save it out – oh and if your character appears to be moving in exactly the same way as it did when you first started this tutorial – check story is turned off..
- Importing an animation file on to a skeleton
Adding a Character to the Story Tool
Creating a Loop in the Story Tool
Aligning a take in the scene
Plotting a take to a Control Rig
Creating a Loop Pose
Applying a Pose
Correcting footsteps
Editing errors in an animation

Source: https://mocappys.com/creating-a-looping-animation-in-motionbuilder/
0 Response to "Time Continue in Motionbuilder in Fcurve"
ارسال یک نظر